

When Pro-Stitcher runs a design, it does something you'd normally do with your hands: it presses the buttons on the handlebars. Start, stop, needle up and needle down all come from the tablet. On Avante and Fusion machines (including similar OEM machines), those commands take a route most owners never see.
How the Signal Gets to Your Machine
The Pro-Stitcher wires run down to a small Handi Quilter board mounted on the Y-encoder, on the carriage under the machine. There they plug onto the board through a small black connector with a latch. The board moves the signal onto spare wires in the encoder's ribbon cable. That cable is already connected to the machine's control board at its other end. It's a tidy design because no extra cable has to run to the machine head. The weak point is that little black connector.
What Goes Wrong
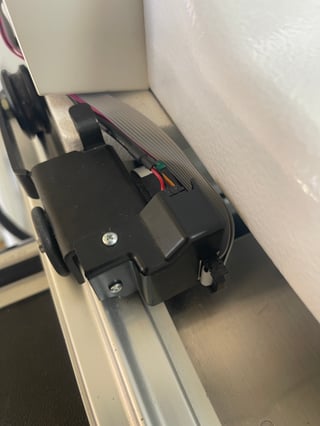
With the cover on, you can only see the top of the connector. It looks fine.
With the encoder cover on, you can only see the top of the connector through the opening, and everything looks normal.
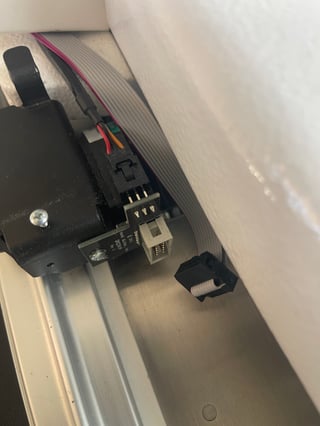
Cover off: bare pins show under the connector. It has lifted off the board.
Take the cover off and you may find the connector has been pulled up the pins. The wires are still attached, the plug is still sitting over the header, and nothing looks broken. Look just below the plug, though, and you'll see bare pins where it should be pressed flat against the board. The plug looks connected, but the circuit isn't.
What You'll Notice
- Pro-Stitcher moves the machine, but the machine won't start stitching when you run a design
- Start/stop or needle up/down from the tablet does nothing, or works only some of the time
- The buttons on the handlebars still work normally, because they don't go through this connection
The Fix
- Turn off the machine and the Pro-Stitcher.
- Unplug the gray ribbon cable from the small board, then remove the screws on the Y-encoder cover and lift the cover off.
- Look at the black connector from the side. If you can see bare pins between the plug and the board, it has lifted.
- Press the connector straight down until it sits flat against the board and no pins show.
- Check that the Pro-Stitcher wires have enough slack that carriage movement won't pull on them.
- Put the cover back on, making sure it doesn't pinch the wires.
- Reconnect the gray ribbon cable to the board. This is easy to forget, and without it the encoder and the Pro-Stitcher signal can't reach the machine.
- Power up and test start/stop from the tablet.
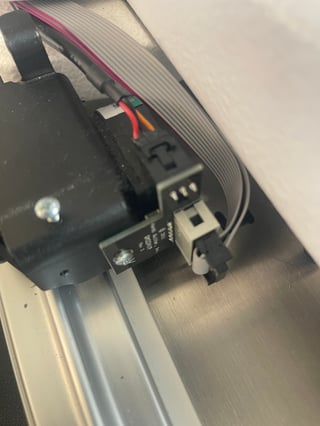
Reseated: the connector sits flat on the board with no pins showing.
When to Call Us
If the connector was seated and the problem is still there, the next places to look are the encoder cable and its connection at the control board. Both take more work to reach. MOTT members can bring this to a Saturday session or a support call. Everyone else can call the shop and we'll walk you through it.